E-invoicing connector help
Receive supplier invoices
How inbound electronic invoices from your suppliers arrive, become pending vendor invoices in Microsoft Dynamics 365 Finance, and what you can do with them.
Written for: Accounts Payable clerks and supervisors
An inbound e-invoice is a supplier invoice that arrives electronically through an e-invoicing network instead of as a paper document, a PDF in your inbox, or a manual keying exercise. The connector collects those electronic invoices from the network, turns each one into a pending vendor invoice inside Finance, and lets you review, accept, or reject it — all from a single screen.
Read this once end-to-end to understand the shape of the process, then keep it nearby as a reference.
What you will be able to do
- See every supplier e-invoice that has arrived, across the legal entities you have access to.
- Let the connector automatically import each invoice into Finance as a pending vendor invoice for your normal AP review.
- Reject an invoice you do not accept, for example a duplicate or a price mismatch, with a reason that is sent back to the supplier through the network.
- Retry an invoice that did not import, or set aside one you are not going to action.
- Open the underlying vendor invoice, and read a full history of everything that happened to each e-invoice.
Your access. This guide covers the buttons available to the AP role. A few specialist recovery tools (for rows that get genuinely stuck or mis-linked) sit with your e-invoicing administrator, not with AP — where that is the right next step, this guide tells you to escalate rather than walking you through a button you will not see.
The big picture
It helps to understand the journey of an inbound e-invoice before looking at individual buttons.
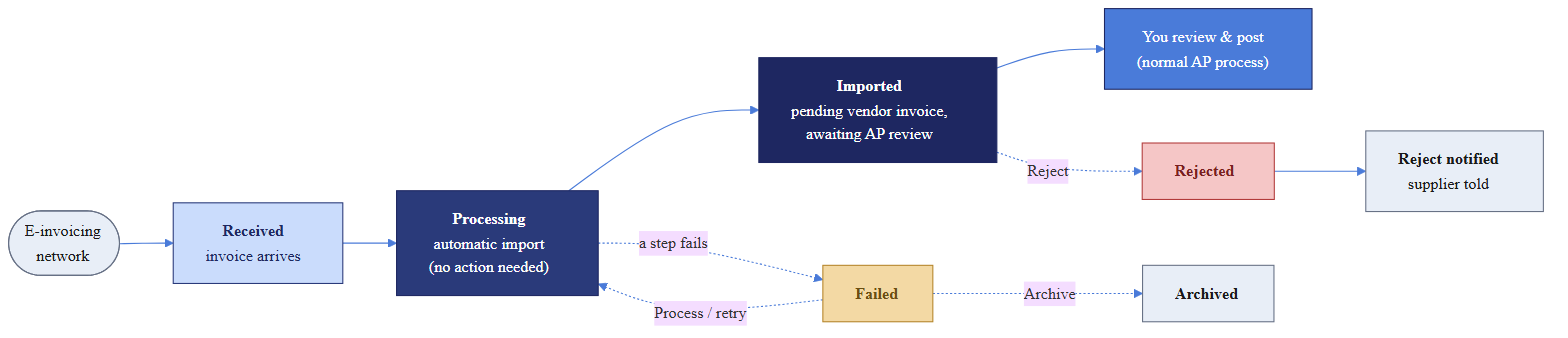
- It arrives. A scheduled job set up by your administrator regularly asks the network whether there are any new invoices for you. Each new invoice is recorded as a row on the Inbound e-invoices list with the status Received. You do not have to do anything for this to happen.
- It is imported automatically. A second scheduled job picks up each Received row and runs it through a short, automatic sequence: it downloads the full invoice, attaches the original file to the row, reads the invoice into Finance as a pending vendor invoice, links the row to that pending invoice, and confirms receipt back to the network. When this finishes, the row’s status becomes Imported.
- You review it. An Imported row is a pending vendor invoice sitting in your normal AP work-list, waiting for your usual review and posting. From the e-invoice screen you can open it, reject it, or simply let your standard AP process post it.
Key idea — Imported does not mean posted. When a row reaches Imported, the invoice has been created as a pending vendor invoice only. It has not been posted to the ledger. Your normal AP review and posting still apply. Think of the e-invoice screen as the delivery and tracking layer that sits in front of your familiar vendor-invoice process.
Where the work happens
Almost everything in this guide happens on one screen: the Inbound e-invoices list page. There are also a couple of helper buttons on the standard vendor-invoice screens (see Working from the vendor-invoice screens).
You find the screen under the Dr Dynamics e-invoicing module → E-invoices group → Inbound e-invoices.
The Inbound e-invoices screen
Open Inbound e-invoices. You will see a list, one row per supplier e-invoice, with a row of action buttons (the Action Pane) across the top.
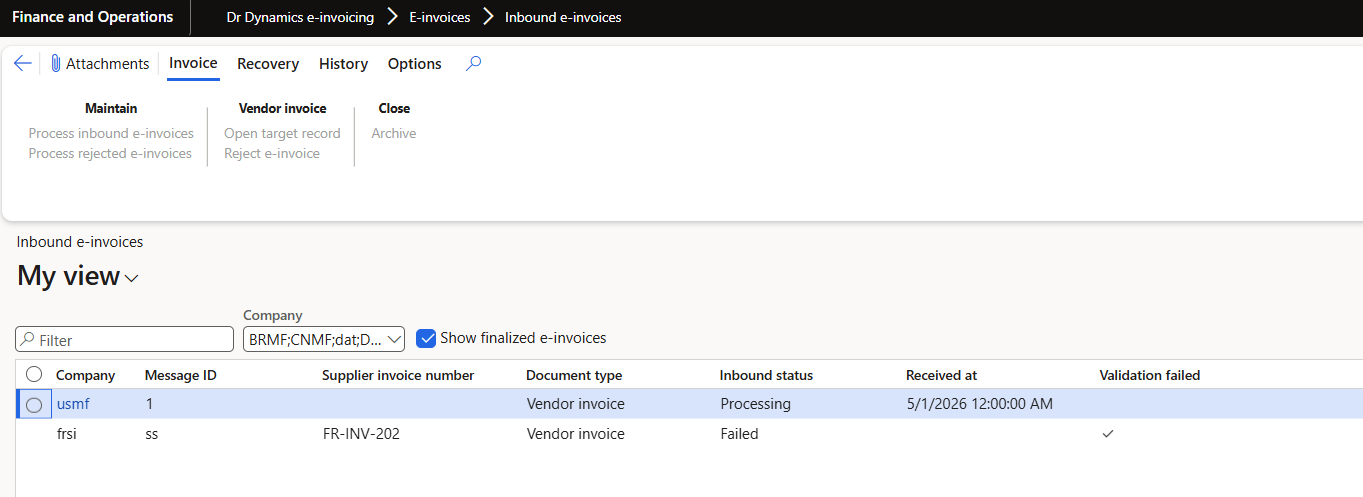
The columns
| Column | What it tells you |
|---|---|
| Message ID | The unique identifier the network gave this invoice. Useful when talking to your administrator. |
| Supplier invoice number | The invoice number the supplier put on the document. |
| Document type | Either Vendor invoice or Vendor credit note. |
| Inbound status | Where the invoice is in its journey (see Understanding statuses). This is the single most important column. |
| Archived | Ticked if the row has been closed out and set aside. Hidden by default (see the filter below). |
| Received at | When the invoice first arrived from the network. |
| Validation failed | Ticked when the connector could not be fully confident it linked the invoice to the right pending vendor invoice. A ticked box is your cue to double-check the linked invoice. |
The filters
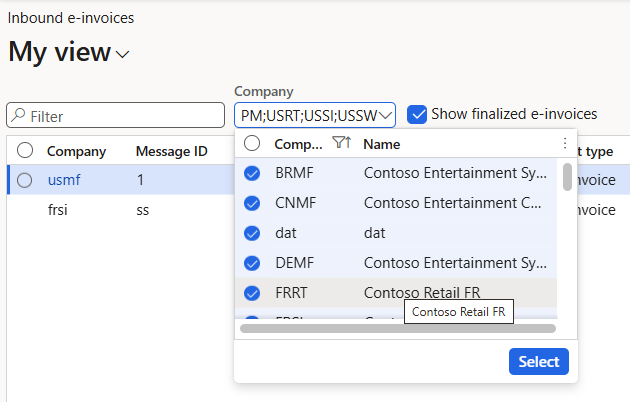
- Company picker — the list is cross-company: it can show e-invoices from several legal entities at once. By default it opens showing your current company. Use the picker to add more legal entities you have access to. (If you only have access to one company, this picker is hidden.)
- Show finalized e-invoices — by default this is unticked, and the list hides invoices that are completely finished with: Reject notified and Archived rows. This keeps your list focused on invoices that still need attention. Tick the box to see everything, including closed rows.
- Quick Filter — type into the filter box above the grid to search. You can also click any column heading to sort or set a column filter, exactly as on any other Finance list.
Understanding statuses
The Inbound status column drives everything: which buttons are available, and what you will be allowed to do. Here is every status you will encounter, in plain language.
| Status | What it means | Typical next step |
|---|---|---|
| Received | The invoice header has arrived but has not been imported yet. | Wait for the automatic import job, or press Process to import it now. |
| Processing | The connector has claimed the row and is actively importing it right now. | Wait. You normally never act on a Processing row. |
| Imported | The import finished — the invoice is now a pending vendor invoice awaiting your AP review. Not yet posted. | Review and post as normal; or Reject it; or Archive it. |
| Failed | A step in the import could not complete. The invoice is safe — nothing was lost. | Process to retry, Archive to set it aside, or escalate to your administrator. |
| Rejected | You have refused the invoice. The supplier is about to be notified. | Usually automatic. Process rejected e-invoices carries it out immediately. |
| Reject notified | The refusal has been carried out and the supplier has been told. Finished. | None — terminal. |
| Archived | You manually closed the row out, for example a duplicate. It keeps its underlying status but is set aside. Finished. | None — terminal. |
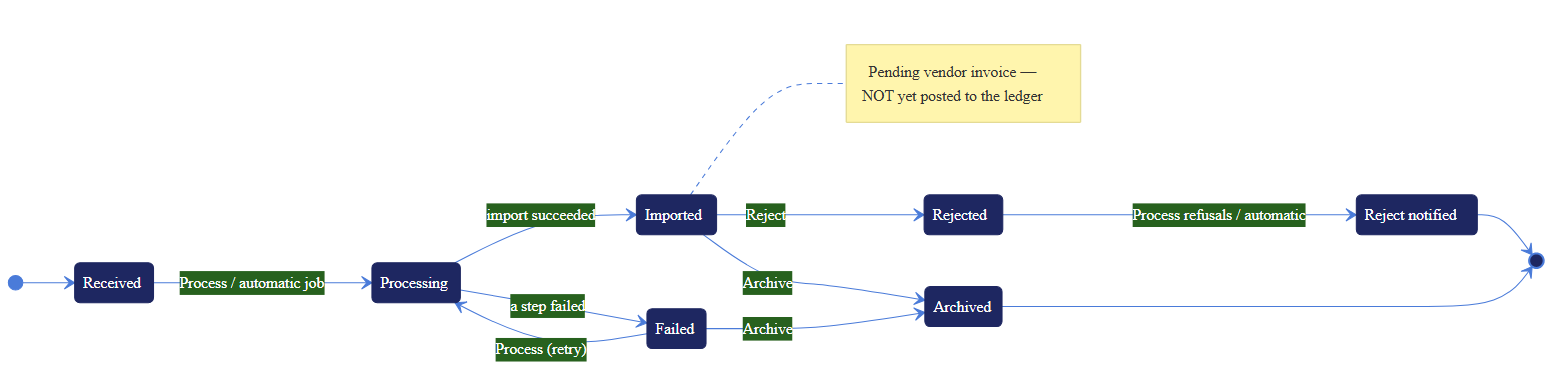
Why some rows seem to move on their own. Statuses such as Processing and Reject notified are reached by background jobs, not by you. If you refresh the list and a row has advanced, that is expected — the scheduled jobs are doing their work.
About the Validation failed flag. A ticked Validation failed box means the import finished but a step raised a warning worth a human look. The two common causes are a validation issue when the invoice was read in (Electronic Reporting flagged something on the document), or the connector not being fully certain which pending vendor invoice to link it to, for example when two shared the same number. The invoice is still imported and usable. Click View history on the row to see exactly what was flagged. If it turns out to be linked to the wrong invoice, ask your e-invoicing administrator to correct the link — that tool sits with the administrator, not AP.
What the automatic import actually does
You do not need to operate the import — but understanding it makes the Failed and Validation failed situations easier to handle.
When a Received row is processed, it passes through four steps in order. Each step records its own timestamp, so if something fails halfway, a retry picks up exactly where it left off rather than starting over.
- Fetch — downloads the full invoice from the network and attaches the original electronic file to the row (you can open it later from Attachments).
- Import — reads the attached invoice into Finance and creates a pending vendor invoice.
- Link — connects the e-invoice row to the pending vendor invoice it just created, so you can jump straight to it. If the match cannot be made with certainty, the row links to the most likely one and ticks Validation failed so you can confirm it.
- Acknowledge — confirms receipt back to the network, so the provider stops re-offering the invoice.
When all four steps succeed, the row becomes Imported. If any step fails, the row becomes Failed and the reason is recorded in the log.
The buttons — full reference
The Action Pane groups your buttons under tabs — Invoice, Recovery, History. This section documents every button you will use; the Recovery tab is administrator territory (see When to escalate). For each: where it is, what it does, exactly when it is available, when it is greyed out, and what happens when you click it. Buttons are named exactly as they appear on screen.
How button availability works. Most buttons act on the row (or rows) you have selected. A button is only enabled when every selected row qualifies for it. If you multi-select a mix of rows and one of them does not qualify, the button greys out. Select a single row to see precisely which actions that row allows. The same rules are enforced again on the server, so a button can never let you do something the invoice’s status does not allow.
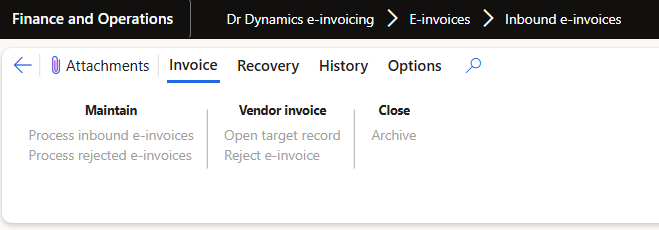
The buttons you use most live on the Invoice tab, in three groups: Maintain, Vendor invoice, and Close.
Invoice tab — Maintain group
Process inbound e-invoices
- What it does: runs the automatic import (Fetch, Import, Link, Acknowledge) on the selected row(s) immediately, instead of waiting for the scheduled job. This is also how you retry a failed invoice. Referred to as Process below.
- Enabled when: every selected row is Received or Failed.
- Greyed out when: any selected row is in another status (Processing, Imported, Rejected, and so on).
- When you click it: the row moves to Processing, the four steps run, and the row finishes as Imported (success) or Failed (a step could not complete). A retried Failed row resumes from the first unfinished step — already-completed work, such as a file already downloaded, is not repeated.
- Good to know: it is always safe to press Process again on a Failed row; duplicates will not be created.
Process rejected e-invoices
- What it does: for invoices you have Rejected, this carries out the consequences of the refusal right away — notifying the supplier and reversing the pending invoice — instead of waiting for the background job.
- Enabled when: every selected row is Rejected.
- Greyed out when: any selected row is not Rejected.
- When you click it: each row moves from Rejected to Reject notified. The screen reports how many were notified and how many failed.
- Note: this is normally handled automatically on a schedule — the button is the do it now shortcut.
Invoice tab — Vendor invoice group
Open target record
- What it does: opens the vendor invoice this e-invoice became — the pending vendor invoice while it is awaiting posting, or the posted vendor invoice once it has been posted.
- Enabled when: the row is linked to a vendor invoice.
- Greyed out when: there is no linked invoice yet, for example a Received, Processing or Failed row that never imported.
- When you click it: the relevant vendor invoice opens. This works even after the invoice is posted, because the link is kept on a key that survives posting.
- If the link is missing: you will see a message that the target record is not set, or that no posted vendor invoice was found for this row yet.
Reject e-invoice
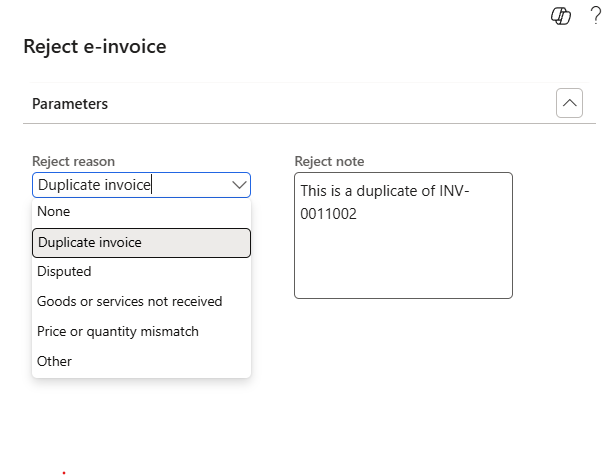
- What it does: refuses the invoice on business grounds — you do not accept it (a duplicate, goods not received, a price dispute, and so on). The refusal is communicated back to the supplier through the network.
- Enabled when: every selected row is Imported.
- Greyed out when: any selected row is not Imported.
- When you click it: you are asked to choose a reject reason and add a note. The available reasons are:
- Disputed — a commercial disagreement (terms, contract, other).
- Duplicate invoice — duplicates one already received.
- Goods or services not received — the billed goods or services were not received.
- Price or quantity mismatch — billed price or quantity does not match the order or receipt.
- Other — anything else; explain it in the note.
- After you confirm, the row moves to Rejected, and a background job then notifies the supplier and reverses the pending invoice, finishing at Reject notified.
What will not work: rejecting a posted invoice. Once the vendor invoice has been posted, it can no longer be rejected from the e-invoice screen. If you try, that row is skipped and you are told that the vendor invoice has already been posted and can no longer be rejected from the e-invoice queue. Refusing a posted invoice must go through your normal posted-invoice correction process, for example a credit note, not this button.
Invoice tab — Close group
Archive
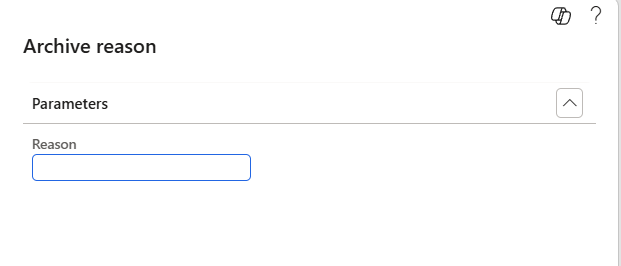
- What it does: closes a row out and sets it aside, without rejecting it — for example a duplicate you are handling elsewhere, or an import you have decided to abandon.
- Enabled when: every selected row is Imported or Failed, and is not already archived.
- Greyed out when: the row is Received, Processing, already finished, or already archived.
- When you click it: you are asked to confirm and to give an archive reason. The row is flagged Archived (its underlying status is preserved) and, with Show finalized e-invoices unticked, it drops off your working list.
- Reversible? Archiving is a closing action. Tick Show finalized e-invoices to see archived rows again.
History tab — View history
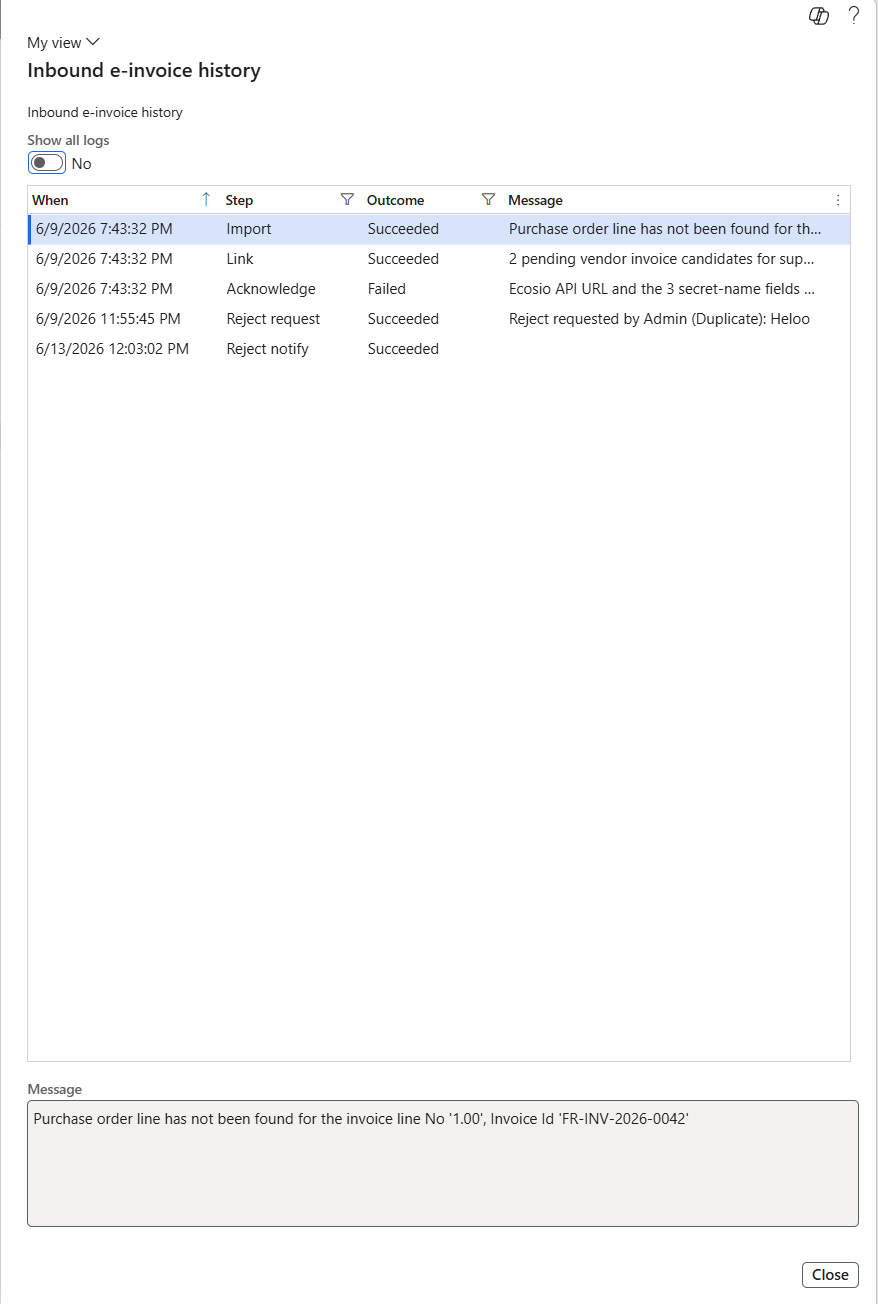
- What it does: opens the complete, step-by-step history of the selected row — Fetch, Import, Link, Acknowledge, and any actions you took — along with any warning that was raised. This is where you look when Validation failed is ticked, to see exactly what was flagged.
- Enabled when: any row is selected.
- Inside the screen: tick Show all logs to include every internal step, not just the headline events.
Attachments
The Attachments button (the standard Finance paperclip) opens the documents attached to the row — most importantly the original electronic invoice file that was downloaded from the network. Use it when you want to see exactly what the supplier sent.
Everyday tasks
Reviewing a new supplier e-invoice
- Open Inbound e-invoices.
- Look for rows with status Imported — these are ready for you.
- Select a row and click Open target record to review the pending vendor invoice in the normal way.
- If Validation failed is ticked on that row, double-check it is the right invoice before you proceed.
- Post it through your standard AP process. Posting happens in the vendor-invoice screens, not here.
Rejecting an invoice you do not accept
- Select the Imported row.
- Click Reject e-invoice.
- Choose the reason (Duplicate, Price or quantity mismatch, and so on) and add a note.
- Confirm. The row moves to Rejected, then Reject notified once the supplier has been told.
- Remember: if the invoice has already been posted, Reject will not work — handle it through your normal posted-invoice correction process instead.
Dealing with a Failed invoice
- Select the Failed row and click View history to see why it failed.
- If it looks like a temporary problem, click Process to retry.
- If you simply want to set it aside, click Archive.
- If it keeps failing, escalate to your e-invoicing administrator — there are specialist recovery tools that sit with that role.
Working from the vendor-invoice screens
You do not always have to start from the Inbound e-invoices screen. Two helper actions appear on the standard vendor-invoice screens so you can act without switching context.
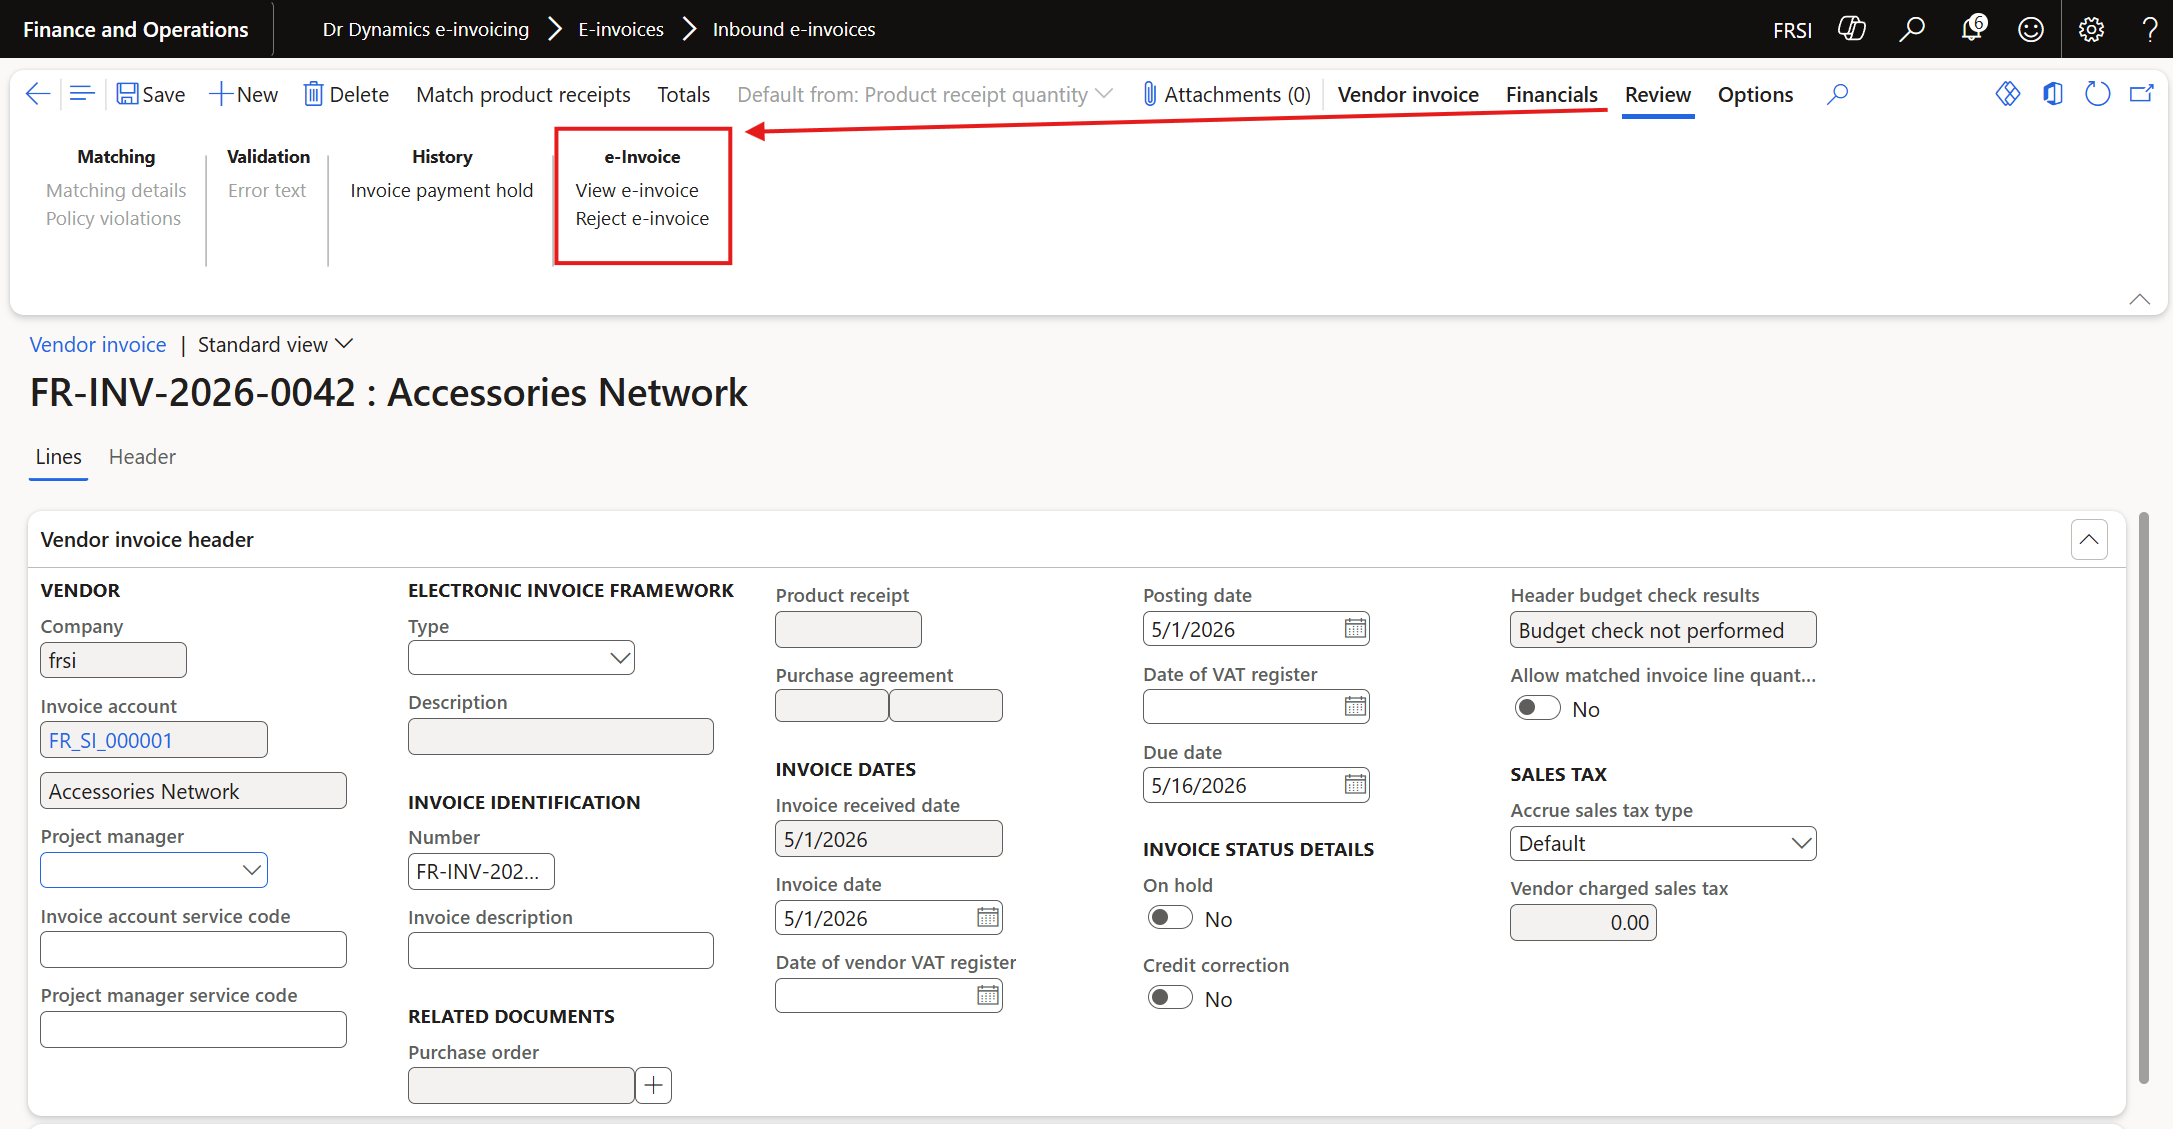
Reject e-invoice — from the pending vendor invoice
While an e-invoice is still a pending vendor invoice (status Imported, not yet posted), a Reject e-invoice button is available directly on the pending vendor invoice entry screen and on the pending vendor invoices list.
It does exactly the same thing as Reject e-invoice on the e-invoice screen: you choose a reason and note, the row moves to Rejected, and the supplier is notified. The same rule applies — once the invoice is posted, the button can no longer reject it.
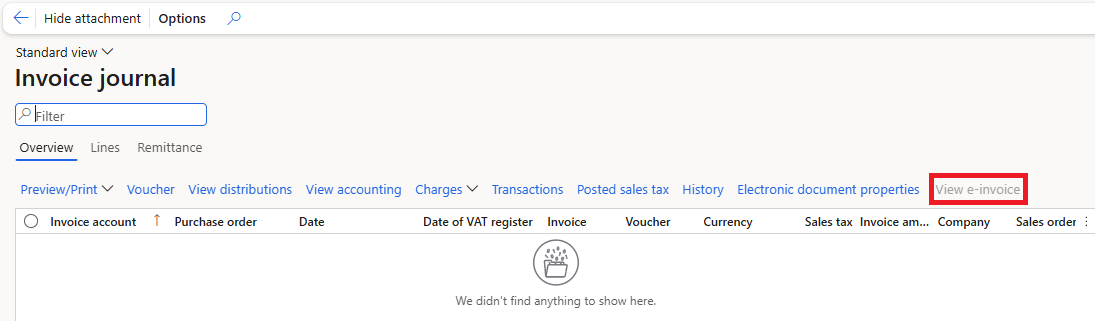
View e-invoice — from the posted vendor invoice
On the posted vendor invoice journal there is a View e-invoice button.
- What it does: jumps straight from the posted invoice to the matching inbound e-invoice row and its attached original file.
- If there is no match: you are told that no inbound e-invoice row is linked to the selected vendor invoice — meaning that invoice did not arrive electronically through this system.
Things that will not work, and why
A short list of deliberate guardrails, so they do not surprise you:
| You try to… | What happens | Why |
|---|---|---|
| Reject a posted invoice | The row is skipped, with a message that it has already been posted and can no longer be rejected. | A posted invoice must be corrected through the normal ledger process, not refused at the network. |
| Process or Reject a finished row | The button is greyed out. | Rejected, notified, and archived rows are closed; reopen the view with Show finalized only to inspect, not to act. |
| Act on a Processing row | The buttons are greyed out. | The row is actively being imported; let it finish. |
When to escalate to your administrator
Some situations need the e-invoicing administrator (or a designated troubleshooter), because the tools for them are intentionally not part of the AP role:
- An invoice has been Processing for a long time and appears stuck.
- A Failed invoice keeps failing on retry.
- A row shows Validation failed and is linked to the wrong pending invoice.
In each case, note the Message ID and hand it to your administrator. The Administration and troubleshooting guide covers what they will do next.
Glossary
- e-invoice — an invoice exchanged electronically over a network, in a structured format, rather than as paper or PDF.
- Pending vendor invoice — an invoice created in Finance but not yet posted; it awaits your AP review.
- Posted — the invoice has been committed to the ledger. Different rules apply once an invoice is posted, notably that it can no longer be rejected here.
- The network / the provider — the e-invoicing service that carries invoices between you and your suppliers.
- Message ID — the network’s unique identifier for one invoice message.
- Acknowledge — confirming receipt of an invoice back to the network, so it stops re-offering it.
- Reject — refusing an invoice you do not accept; the reason is sent back to the supplier.