E-invoicing connector help
Send customer invoices
How to send outbound electronic invoices to your customers from Microsoft Dynamics 365 Finance — queueing, sending, generate-and-hold, and delivery tracking.
Written for: Accounts Receivable clerks and supervisors
An outbound e-invoice is a customer invoice — or a project invoice — delivered electronically through an e-invoicing network, instead of printed, emailed as a PDF, or posted in the mail. The connector takes an invoice you have already posted in Finance, turns it into the correct electronic format, transmits it to your customer through the network, and then keeps you informed of what happens to it on the way.
Read this once end-to-end to understand the shape of the process, then keep it nearby as a reference.
What you will be able to do
- Queue a posted customer or project invoice for electronic delivery, one at a time or several together.
- Let the connector generate the electronic file and transmit it to your customer through the network.
- Generate the file now and hold it for a manual send later, when that suits your process.
- Track what the customer side did with each invoice — delivered, fetched, processed, and so on.
- Jump back to the original invoice, and read a full history of everything that happened to each e-invoice.
Your access. This guide covers the buttons available to the AR role. A few specialist recovery tools (for rows that get genuinely stuck mid-send, and the low-level network call log) sit with your e-invoicing administrator, not with AR — where that is the right next step, this guide tells you to escalate rather than walking you through a button you will not see.
The big picture
It helps to understand the journey of an outbound e-invoice before looking at individual buttons.
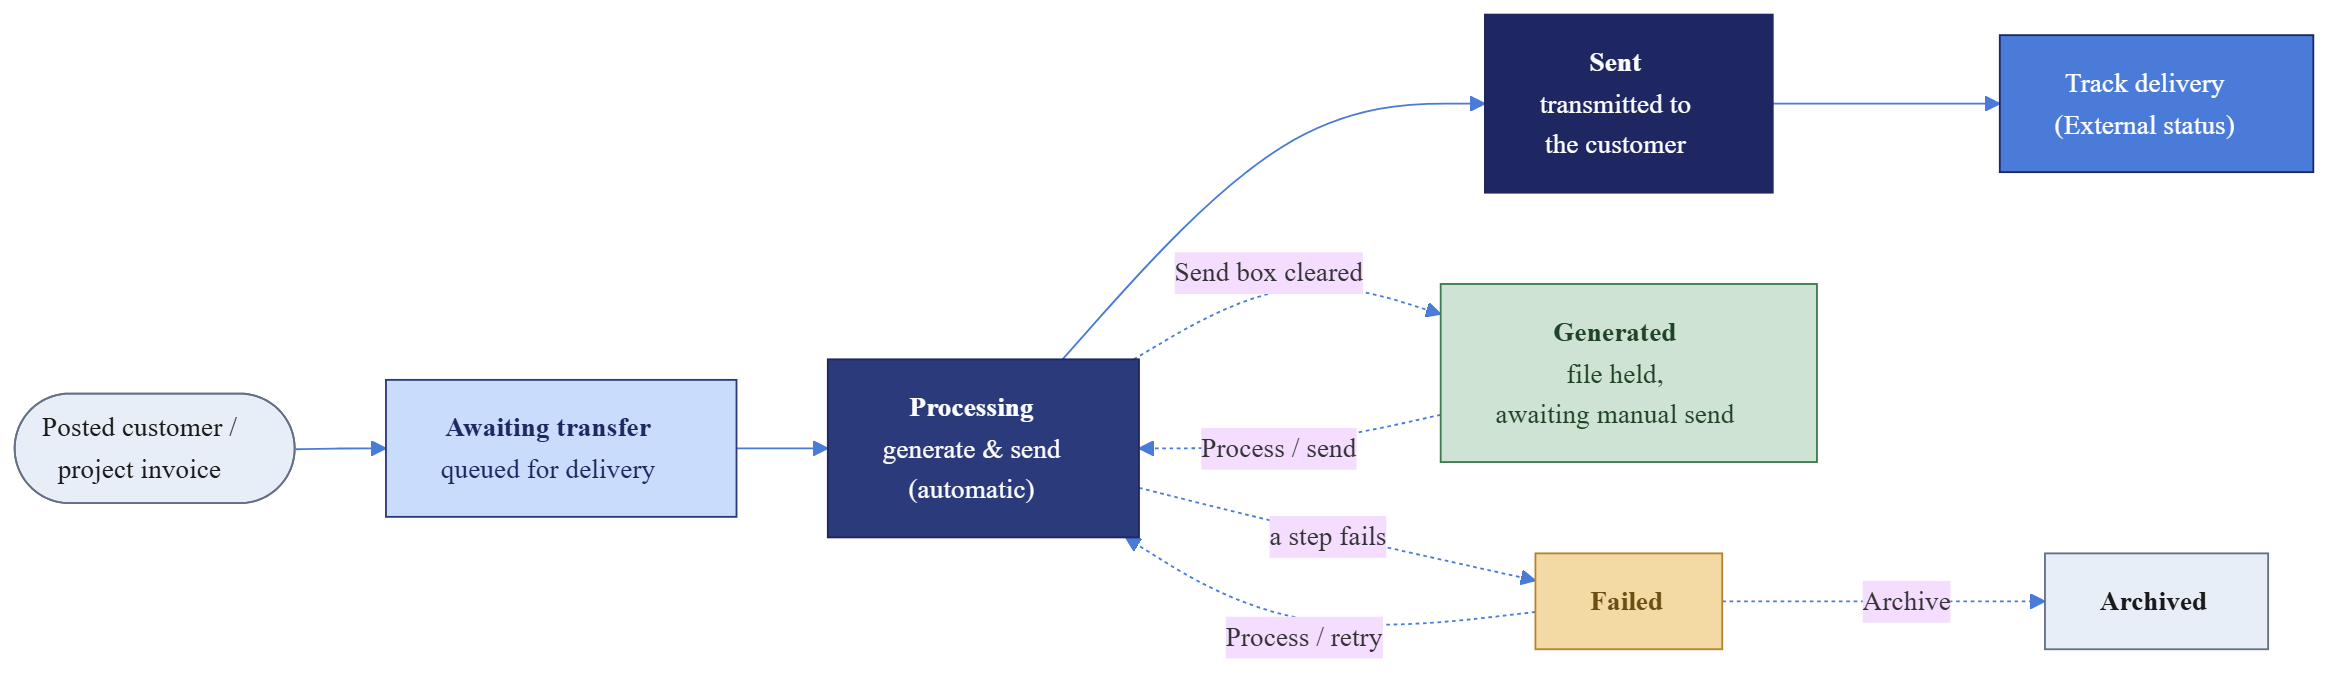
- You queue it. Once an invoice is posted in Finance, you (or an automatic rule) add it to the Outbound e-invoices list as a row with the status Awaiting transfer. No file has been produced yet — the row is simply a request to send.
- The connector prepares and sends it. When the row is processed — by you pressing a button, or by a scheduled job your administrator set up — a short, automatic sequence runs: it generates the electronic invoice file and attaches it to the row, then sends that file to your customer through the network and records the network’s message reference. When this finishes, the row’s status becomes Sent.
- You track delivery. Once an invoice is Sent, the network reports back what the customer side is doing with it — delivered, fetched, processed, and so on. You can refresh this at any time, and a scheduled job keeps it up to date for you.
Key idea — the invoice is already posted. The e-invoice screen is a delivery and tracking layer. It does not post the invoice, change its amounts, or affect the ledger. The invoice was posted through your normal AR process first; this screen only takes care of getting the electronic copy to the customer and telling you how delivery went.
Where the work happens
Most of this guide happens on one screen: the Outbound e-invoices list page. There are also two helper buttons on the standard customer and project invoice journals (see Working from the invoice journals), which is where many users will actually start.
You find the screen under the Dr Dynamics e-invoicing module → E-invoices group → Outbound e-invoices.
How an invoice gets into the queue
There are two ways a posted invoice becomes an outbound e-invoice row. Which ones are switched on for you is an administrator setting.
1. You send it manually from the invoice journal
This is the everyday path. From the posted customer invoice journal (or the project invoice journal), you select one or more invoices and click Send e-invoice. Each selected invoice is added to the Outbound e-invoices list with the status Awaiting transfer.
Sending the same invoice twice. If an invoice you selected has already been queued before, the connector warns you up front — it tells you how many of your selected invoices already have an e-invoice and asks you to confirm before it creates another one. You can cancel the whole action at that point. This stops you accidentally sending a customer two copies.
2. The connector queues it automatically when you post
Your administrator can switch on an option that queues an invoice automatically, at the moment it is posted — so you never have to press Send e-invoice at all. This only happens when both of these are true:
- the automatic-queue option is switched on for the legal entity, and
- the customer on the invoice is flagged for e-invoicing on their customer record.
If either is off, nothing is queued automatically and the manual Send e-invoice button remains your way in.
Which path is set up for you? Whether invoices are queued automatically on posting or only by the Send e-invoice button — and whether they are sent straight away or generated-and-held for a manual send — is configured by your administrator. Ask your administrator how it is set up for your team; this guide explains every option so it makes sense either way.
The Outbound e-invoices screen
Open Outbound e-invoices. You will see a list, one row per queued invoice, with a row of action buttons (the Action Pane) across the top.
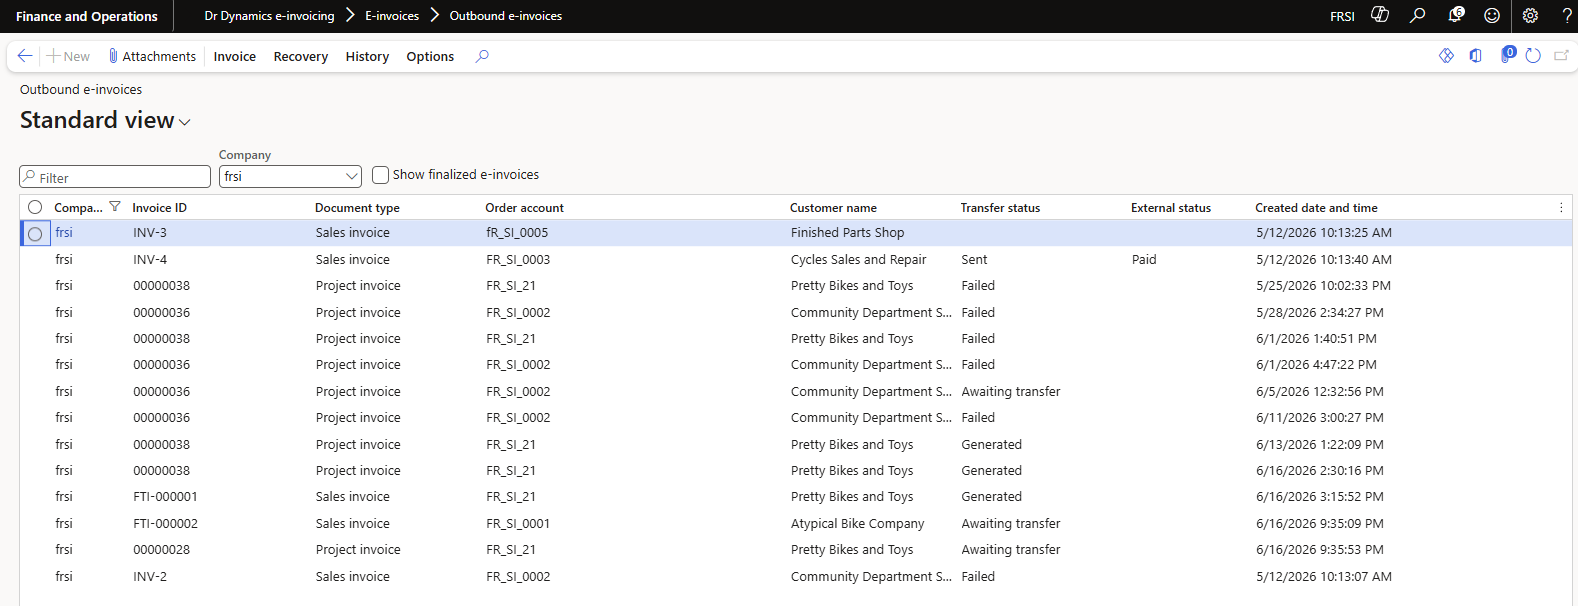
The columns
| Column | What it tells you |
|---|---|
| Company | The legal entity the invoice belongs to. The list is cross-company, so this tells you which entity each row came from. |
| Invoice ID | The number of the customer or project invoice this row was created from. |
| Document type | Whether the source is a Sales invoice (customer invoice) or a Project invoice. |
| Order account | The customer account the invoice is for. |
| Customer name | The name of the customer, for quick reading. |
| Transfer status | Where the invoice is in the send process (see Understanding statuses). This is the most important column. |
| External status | What the customer side has done with the invoice once it was sent — the delivery tracking reported back by the network. |
| Created date and time | When the row was queued. |
| Archived | Ticked if the row has been closed out and set aside. Hidden by default (see the filter below). |
The filters
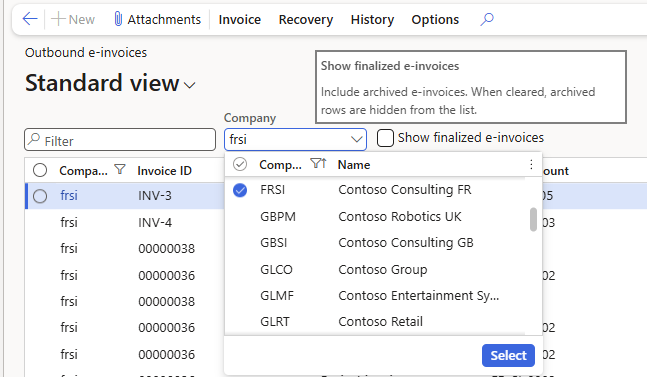
- Company picker — the list is cross-company: it can show e-invoices from several legal entities at once. By default it opens showing your current company. Use the picker to add more legal entities you have access to. (If you only have access to one company, this picker is hidden.)
- Show finalized e-invoices — by default this is unticked, and the list hides rows that have been Archived, keeping your list focused on invoices that still need attention. Tick the box to see archived rows as well. A Sent invoice still being tracked, or a Failed one, always stays visible — those are exactly the rows that need you.
- Quick Filter — type into the filter box above the grid to search by invoice number. You can also click any column heading to sort or set a column filter, exactly as on any other Finance list.
Understanding statuses
Two status columns work together. Transfer status tracks getting the invoice out of Finance and onto the network. External status tracks what happens to it after that, on the customer side.
Transfer status — the send process
| Status | What it means | Typical next step |
|---|---|---|
| Awaiting transfer | The invoice has been queued but not yet sent. No file produced yet. | Wait for the automatic job, or press Process to send it now. |
| Processing | The connector has claimed the row and is actively generating or sending it right now. | Wait. You normally never act on a Processing row. |
| Generated | The electronic file has been produced and attached, but not yet sent — the row is held for a manual send. | Press Process (with Send to provider ticked) to transmit it. |
| Sent | The file has been transmitted to the customer through the network. | Track delivery with Update status; nothing else needed unless it fails downstream. |
| Failed | A step could not complete. Nothing was lost — the invoice itself is untouched. | Process to retry, Archive to set it aside, or escalate to your administrator. |
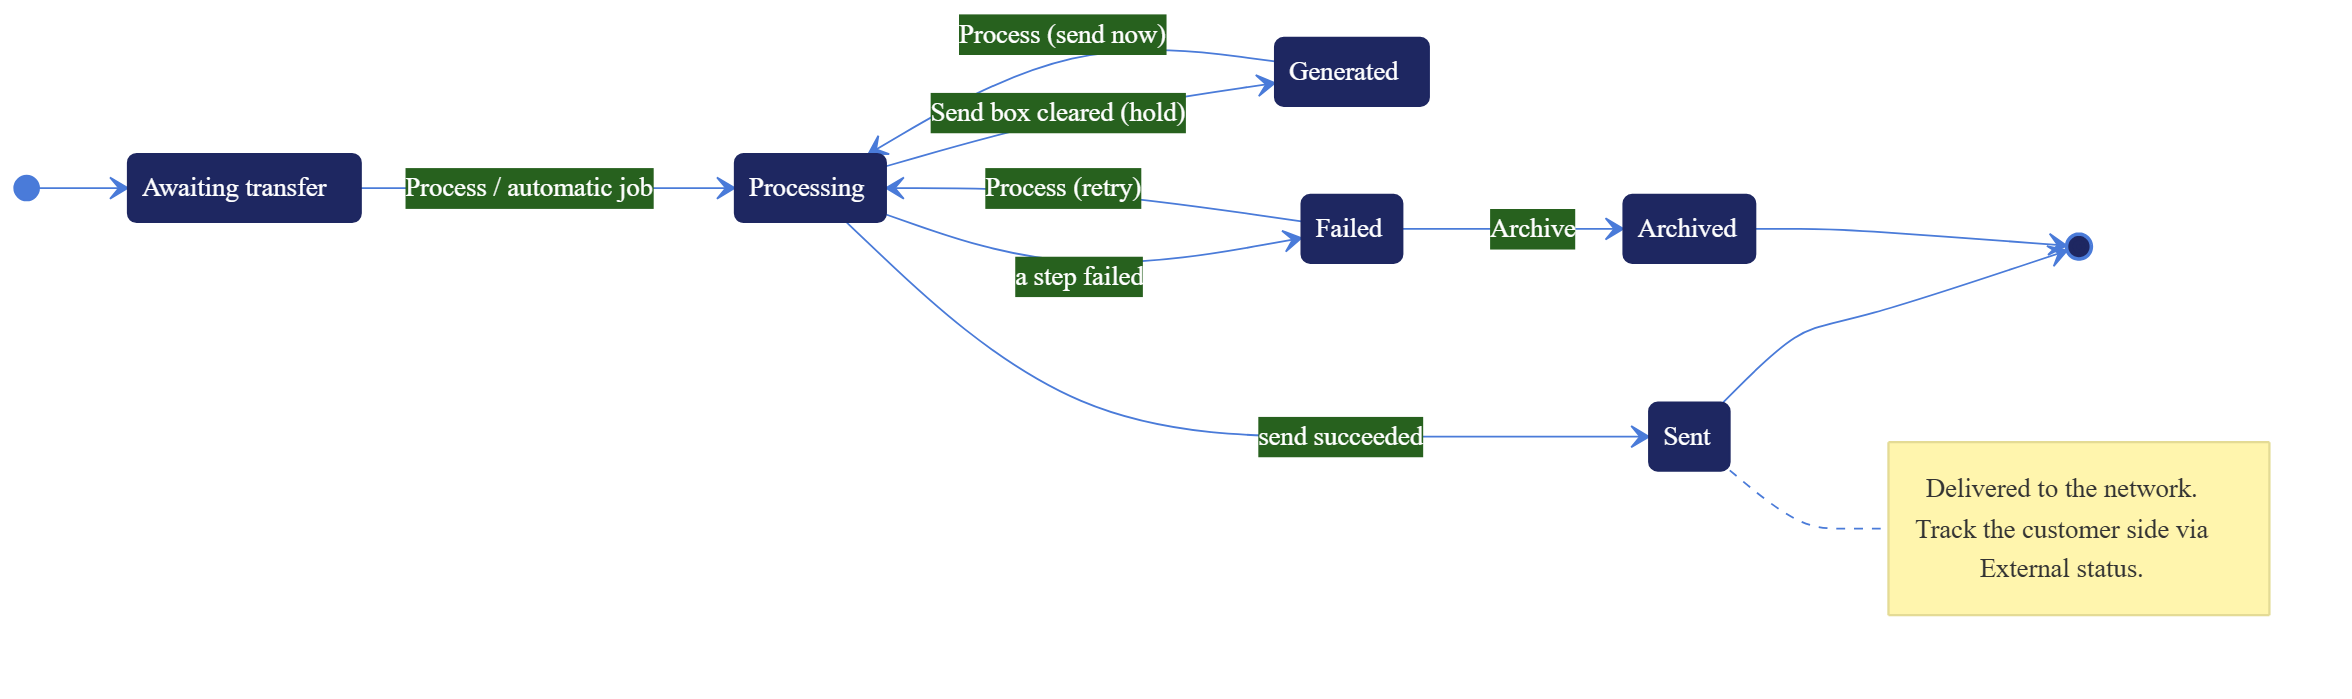
Why some rows move on their own. Statuses such as Processing and Sent can be reached by background jobs, not only by you. If you refresh the list and a row has advanced, that is expected — the scheduled jobs are doing their work.
External status — what the customer side did
Once a row is Sent, the External status column tells you how delivery is going. It is read-only — the network reports it, you do not set it. You refresh it with Update status (and a scheduled job refreshes it for you).
| External status | What it means |
|---|---|
| None | No report from the network yet. |
| Sent | The invoice reached the network and is on its way. |
| Delivered | It arrived at the customer’s receiving point. |
| Fetched | The customer has retrieved it. |
| Deposited | It has been lodged with the customer or their tax platform. |
| Approved | The customer accepted it. |
| Processed | The customer has fully processed it. (End of tracking.) |
| Paid | The customer marked it paid. (End of tracking.) |
| Rejected | The customer or the network rejected it — for example a format or validation problem. (End of tracking.) |
| Refused | The customer refused it on business grounds. |
| Failed | The network reported a delivery failure. (End of tracking.) |
When tracking stops. Once an invoice reaches Processed, Paid, Rejected, or Failed, there is nothing further to follow, so the connector stops polling it and the Update status button greys out for that row. Every other external status keeps tracking.
A note on Rejected / Refused / Failed. These tell you the customer side did not accept the invoice. The e-invoice screen does not fix this for you — treat it as a signal to follow up with the customer through your normal AR process, for example by re-issuing a corrected invoice. The View history button shows you exactly what the network reported.
What the automatic send actually does
You do not need to operate the send — but understanding it makes the Generated and Failed situations easier to handle.
When a queued row is processed, it passes through two steps in order. Each step records its own timestamp, so if something fails halfway, a retry picks up exactly where it left off rather than starting over.
- Generate — produces the electronic invoice file in the correct format and attaches it to the row (you can open it later from Attachments). Once a file has been generated, a retry will not generate it again.
- Send — transmits the attached file to your customer through the network and records the network’s message reference on the row.
Whether the Send step runs is controlled by the Send to provider toggle on the Process dialog:
- Send to provider = Yes (the normal case) — both steps run, and the row finishes as Sent.
- Send to provider = No (generate-and-hold) — only Generate runs; the row finishes as Generated and waits for you to send it later. This is a deliberate, positive state — the file is ready, you have simply chosen not to transmit it yet.
If a step cannot complete, the row becomes Failed and the reason is recorded in the log.
The buttons — full reference
The Action Pane groups your buttons under tabs. This section documents every button you will use. A Recovery tab with a Reset button, and a View HTTP log button, also exist — those are administrator tools; see When to escalate. For each button: where it is, what it does, exactly when it is available, when it is greyed out, and what happens when you click it. Buttons are named exactly as they appear on screen.
How button availability works. Most buttons act on the row (or rows) you have selected. A button is only enabled when every selected row qualifies for it. If you multi-select a mix of rows and one of them does not qualify, the button greys out. Select a single row to see precisely which actions that row allows. The same rules are enforced again on the server, so a button can never let you do something the invoice’s status does not allow.
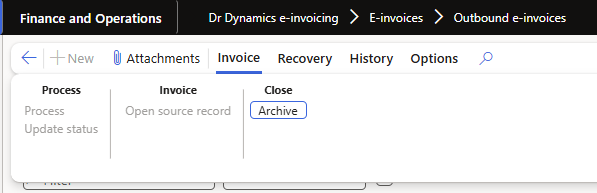
The buttons you use most live on the Invoice tab, in three groups: Process, Invoice, and Close. The tabs across the Action Pane are Invoice, Recovery, History, and Options.
Invoice tab — Process group
Process
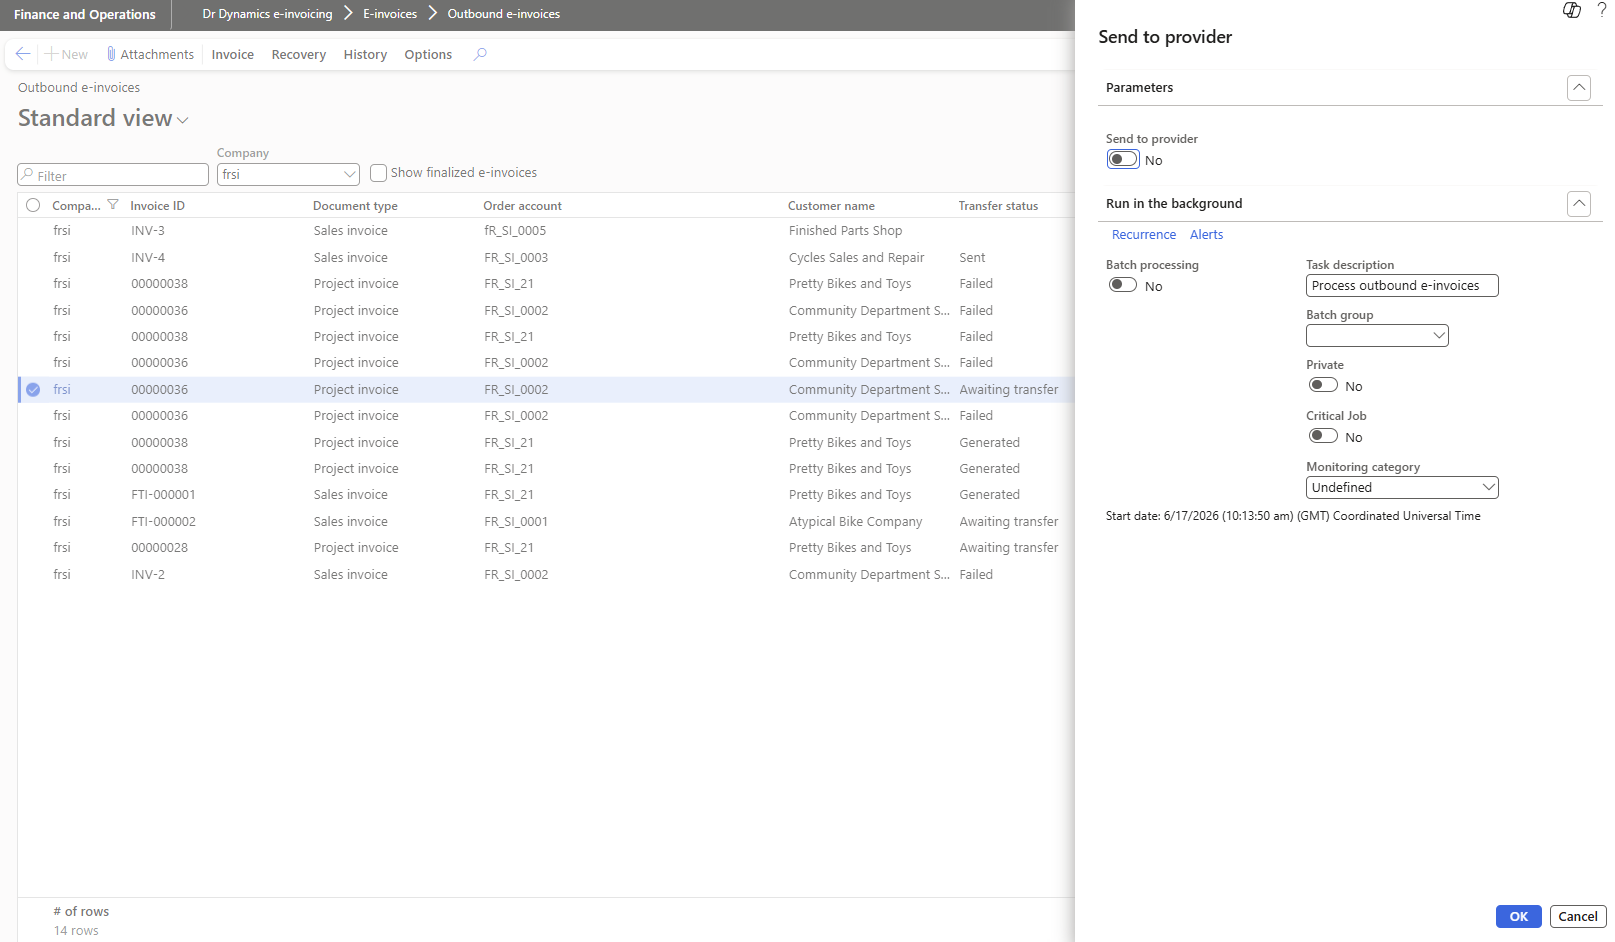
- What it does: runs the send sequence (Generate, then Send) on the selected row(s). This is the main button on the screen — it is how you send a queued invoice now, retry a failed one, or transmit a held one.
- Enabled when: every selected row is Awaiting transfer, Failed, or Generated.
- Greyed out when: any selected row is Processing or already Sent.
- When you click it: a dialog headed Send to provider opens. It carries a Send to provider toggle (Yes / No), plus the standard Run in the background options (a Batch processing toggle and a task description) for scheduling it:
- Send to provider = Yes — the file is generated (if not already generated) and transmitted. The row moves through Processing and finishes as Sent.
- Send to provider = No — the file is generated only and held; the row finishes as Generated for you to send later. (This is generate-and-hold.)
- Retrying a Failed row: press Process again. The row resumes from the first unfinished step — a file that was already generated is not produced a second time, so you never get duplicates.
- Sending a held (Generated) row: select it, press Process, and set Send to provider to Yes. The Generate step is skipped (the file already exists) and only the Send step runs.
Update status
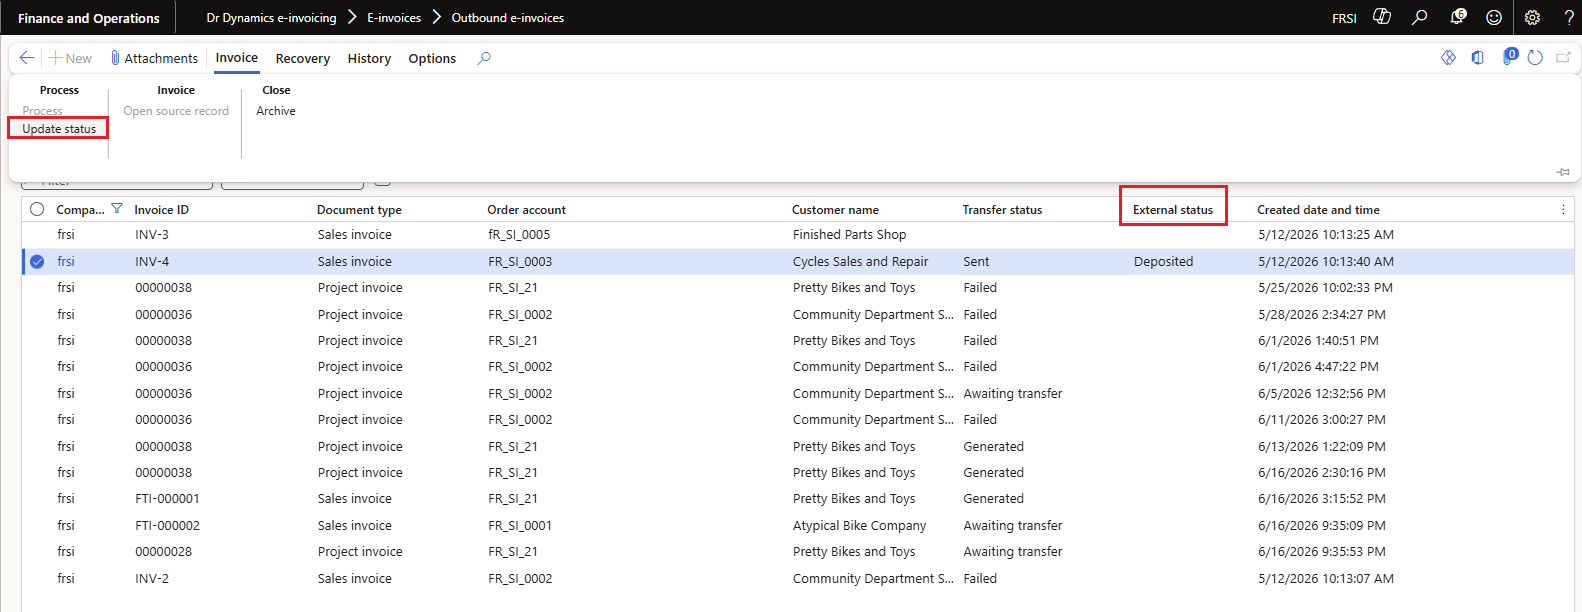
- What it does: asks the network for the latest delivery status of the selected row(s) and refreshes the External status column. (This is the poll action.)
- Enabled when: every selected row is Sent and its external status is still being tracked (not yet Processed, Paid, Rejected, or Failed).
- Greyed out when: any selected row is not yet Sent, or its tracking has already reached an end state.
- When you click it: the network is contacted, the External status is updated for each row, and the time of the check is stamped. Nothing about the invoice itself changes — this is read-only tracking.
- Good to know: a scheduled job normally does this for you in the background; the button is the check it now shortcut. It is always safe to press.
Invoice tab — Invoice group
Open source record
- What it does: opens the original posted invoice this row was created from — the customer invoice journal or the project invoice journal.
- Enabled when: the row carries a link back to its source invoice (this is set when the row is queued, so it is effectively always available).
- When you click it: the originating invoice journal opens, focused on that invoice.
- If the link is broken: you will see a clear message that the source record could not be opened, for example if the original was removed.
Invoice tab — Close group
Archive
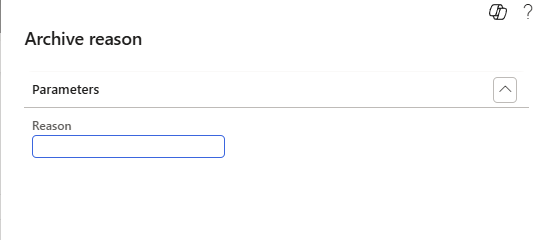
- What it does: closes a row out and sets it aside — for example a row you no longer need to track, or one you have decided to abandon. It does not un-send or recall an invoice; it only tidies your working list.
- Enabled when: the row is not currently Processing, and is not already archived.
- Greyed out when: the row is Processing (its send may still be in flight — it must be reset by an administrator first), or it is already archived.
- When you click it: a small Archive reason dialog opens with a single Reason field — type why you are closing the row and confirm. The row is flagged Archived (its transfer status is preserved), and with Show finalized e-invoices unticked it drops off your working list.
- Reversible? Archiving is a closing action. Tick Show finalized e-invoices to see archived rows again.
History tab — View history
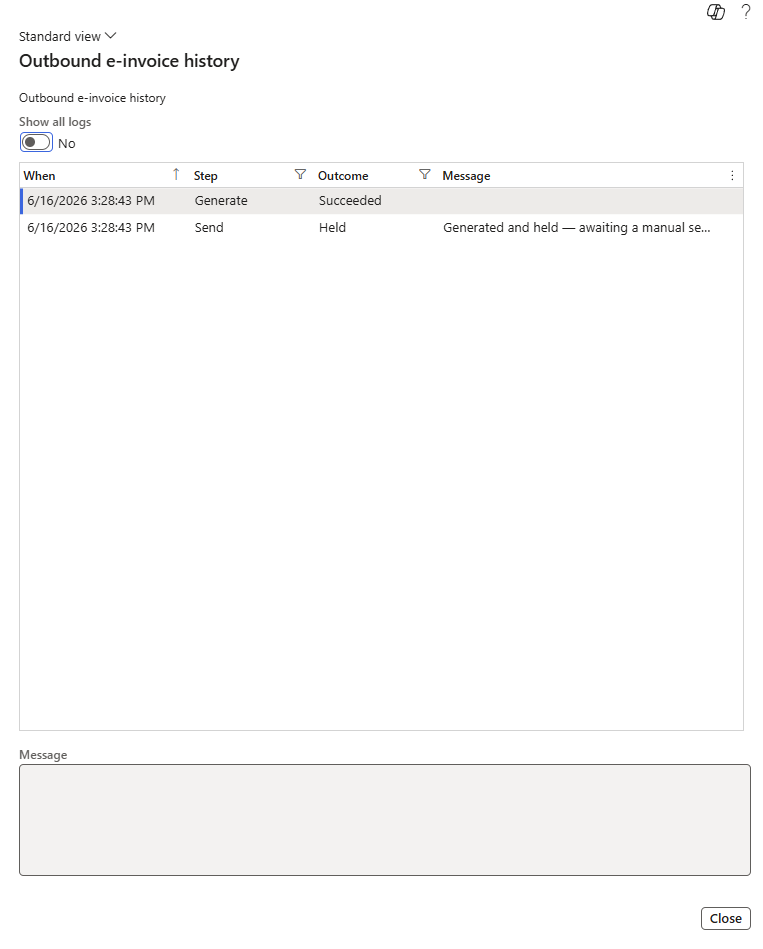
- What it does: opens the complete, step-by-step history of the selected row — Generate, Send, every status check, and any action taken — along with any warning that was raised. This is where you look to see exactly what happened, or why a row Failed.
- Enabled when: any row is selected.
- Inside the screen (titled Outbound e-invoice history): each step — Generate, Send, and any status check — is listed with its Outcome and a Message. Set the Show all logs toggle to Yes to include every internal step, not just the headline events.
- Related button: a View log button alongside it opens the broader log list for the row; View history is the per-row, plain-language view and is the one to reach for first.
Attachments
The Attachments button (the standard Finance paperclip) opens the documents attached to the row — most importantly the electronic invoice file that was generated and sent. Use it when you want to see exactly what was transmitted to the customer.
Everyday tasks
Sending a posted invoice
- Open the Outbound e-invoices list, or start from the invoice journal (see below).
- Select the row(s) with status Awaiting transfer.
- Click Process.
- Set Send to provider to Yes, and click OK.
- The row moves to Processing, then Sent. The customer now has the invoice.
Do you even need to do this? In most setups a scheduled job sends queued invoices for you — Awaiting transfer rows are picked up and transmitted automatically, with no button-pressing. Sending manually with Process / Send to provider is optional: use it only when the automatic send job is not configured, or when you want to push one specific invoice out right now rather than wait for the next run. Ask your administrator whether the automatic send job is set up for your team.
Generating now and sending later (generate-and-hold)
- Select the Awaiting transfer row(s).
- Click Process, set Send to provider to No, and click OK.
- The row finishes as Generated — the file is prepared and attached, but not transmitted.
- When you are ready to send, select the Generated row, click Process, set Send to provider to Yes, and click OK. The row moves to Sent.
Tracking what happened to a sent invoice
- Find the row with status Sent.
- Read the External status column — it shows the latest the network reported (Delivered, Fetched, Processed, and so on).
- To refresh it right now, select the row and click Update status.
- If the external status shows Rejected, Refused, or Failed, click View history to see what the network said, then follow up with the customer through your normal AR process.
Dealing with a Failed invoice
- Select the Failed row and click View history to see why it failed.
- If it looks like a temporary problem, click Process to retry.
- If you simply want to set it aside, click Archive.
- If it keeps failing, escalate to your e-invoicing administrator — there are specialist recovery tools that sit with that role.
Working from the invoice journals
Many AR users will not open the Outbound e-invoices screen at all day-to-day — they work from the posted invoice journals. On the customer invoice journal (and the project invoice journal) there is an E-Invoice tab holding two buttons: Send e-invoice and View e-invoice.
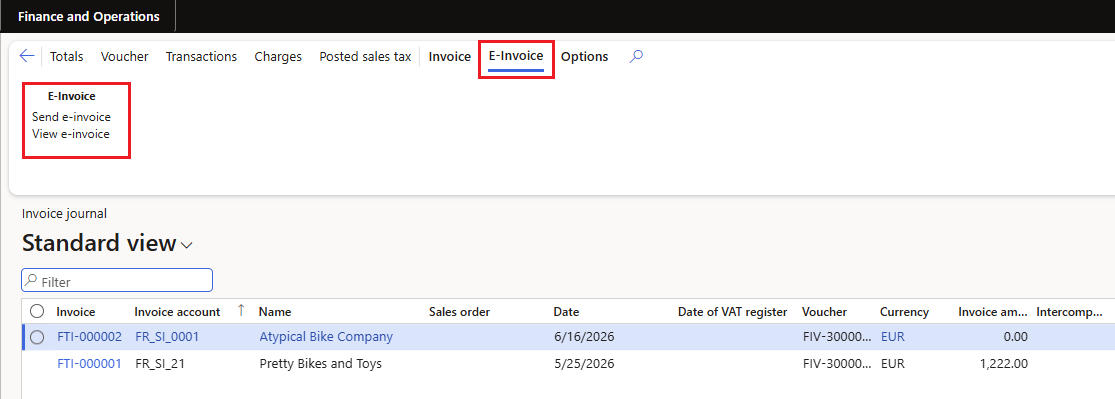
Send e-invoice — queue an invoice for delivery
- What it does: queues the selected posted invoice(s) for electronic delivery — it creates the Awaiting transfer row(s) on the Outbound e-invoices list. You can select several invoices at once.
- When you click it: if any selected invoice has already been queued, you are warned and asked to confirm before another e-invoice is created for it, so you do not send a customer a duplicate. Otherwise the row is queued straight away.
- What it does not do: it does not send the invoice on its own — it puts it in the queue. The send itself happens when the row is processed, by you or by the scheduled job, exactly as described above.
View e-invoice — jump to the queued row
- What it does: jumps straight from the posted invoice to its outbound e-invoice row, so you can see its transfer status, external status, and history without searching the list.
- If there is no match: you are told that no outbound e-invoice row is linked to the selected invoice — meaning that invoice has not been queued for electronic delivery.
Things that will not work, and why
A short list of deliberate guardrails, so they do not surprise you:
| You try to… | What happens | Why |
|---|---|---|
| Update status on a row that is not Sent | The button is greyed out. | There is nothing to track until the invoice has actually been sent. |
| Update status on a fully tracked row | The button is greyed out. | Once an invoice is Processed, Paid, Rejected, or Failed, tracking is finished — there is nothing more to ask the network. |
| Process a row that is already Sent | The button is greyed out. | The invoice has been delivered; sending again would be a duplicate. Re-queue from the journal if you genuinely need to resend. |
| Archive a Processing row | The button is greyed out. | The send may still be in flight; it must be reset by an administrator before it can be closed. |
| Act on a Processing row | The buttons are greyed out. | The row is actively being generated or sent; let it finish. |
When to escalate to your administrator
Some situations need the e-invoicing administrator (or a designated troubleshooter), because the tools for them are intentionally not part of the AR role:
- An invoice has been Processing for a long time and appears stuck. Only an administrator can Reset it back to Awaiting transfer so it can be retried.
- A Failed invoice keeps failing on retry, and View history does not make the cause clear.
- You need to inspect the low-level network call log (the View HTTP log button) to diagnose a delivery problem.
In each case, note the invoice number and the External status, and hand them to your administrator. The Administration and troubleshooting guide covers what they will do next.
Glossary
- e-invoice — an invoice exchanged electronically over a network, in a structured format, rather than as paper or PDF.
- Queue / Awaiting transfer — an invoice that has been lined up for electronic delivery but not yet sent.
- Generate — producing the electronic invoice file and attaching it to the row.
- Generate-and-hold — generating the file now but deliberately not sending it yet; the row rests in Generated until you send it.
- Send / Sent — transmitting the file to the customer through the network.
- Transfer status — where an invoice is in the send process (Awaiting transfer → Processing → Sent / Generated / Failed).
- External status — what the customer side did with the invoice after it was sent (Delivered, Fetched, Processed, and so on); reported by the network, read-only.
- Update status (poll) — asking the network for the latest external status.
- The network / the provider — the e-invoicing service that carries invoices between you and your customers.